Custom Forms
What is the Encompass Web Input Form Builder?
The Encompass Web Input Form Builder enables Encompass administrators to create and design Custom Forms.
You can download the Encompass Web Input Form Builder User's Guide as a PDF file from the Encompass Guides & Documents page
To Access Encompass Web Input Form Builder:
• Log in to the Encompass Admin Portal and select Customization, and then select Custom Forms.
• On the tool bar, select New to access the Encompass Web Input Form Builder and create a new form.
Custom Event Handlers
From the time a form is first displayed to the user, to the time the user navigates to another form or closes the loan, the system provides opportunities, called “events,” to execute custom code. For example, an event occurs whenever the user clicks a button element or modifies the contents of a text box. By adding your own custom functionality to these events, you can add significant functionality to your form beyond the simple fill-in-the-blanks default behavior.
Within the Encompass Web Input Form Builder, different elements provide different events. The button element provides a click event while the text box element provides a change event.
In order to add your custom code to any event, you must author an “event handler.” An event handler is the code that the system will execute at the time the associated event occurs. For example, you can create an event handler for a button's click event that instructs the system to copy the value of one loan field into another.
Custom code for event handlers are written in JavaScript. To create a new custom event handler, you should first know the element on which the event will occur.
To Write Code To Trigger an Event:
- Select the element for the desired event in the workspace.
- On the Properties window, select the Events tab.
- Select the Code Editor icon
</>next to the event dropdown to add new code or edit existing JavaScript code. See Using the Code Editor later in this section. - When finished, select Save, and then select Close.
When saving event handler code directly from the Code Editor, a default file name is given if no files are linked to the form. If a file name already exists, you will be prompted to rename the JavaScript file before saving.
Types of Events
You can create event handlers for the following events using the Editor:
- Change Event - Triggered whenever data within the element has changed. It generally occurs when the user leaves the field after making a modification.
- When this event is called, the data in the element has already been committed to the underlying loan.
- Click Event - Triggered when the user clicks a element, typically a button.
- FocusIn Event - Fired on a element any time the element gains the input focus. This can happen by virtue of the user clicking the element or by tabbing to the element.
- FocusOut - Triggered any time the input focus leaves the field. The focus leaves a field when the user clicks another field or tabs out of the field.
- Load Event - Fires on the Form object when all elements on the form are populated and the form is ready for user input.
- Unload Event - Raised to notify the form that it is about to be closed. The user may have elected to open a new input form or may be closing the loan. This event cannot be used to prevent the form from being unloaded and you should avoid using functionality that displays a user interface.
Event Reference
For examples of use cases and sample code for event handlers, see ICE Scripting Objects Reference.
Enabling and Disabling Elements
All elements in the Encompass Web Input Form Builder use the ng-disabled property to enable/disable the element. Although the value of the property is hardcoded at the time of token generation, the ICE Scripting Framework allows for the toggling of an element’s disabled property.
You can toggle the disabled property on the following elements:
• Button
• Calendar
• Check Box
• Contact Button
• Dropdown
• Hyperlink
• Label
• Multi-Line Text Box
• Radio Button
• Rolodex
• Text Box
All elements in the Encompass Web Input Form Builder have the ControlID property, used to identify the element. You can change the Control IDs of the elements. They must be unique, begin with a letter, and contain only the characters A-Z, 0-9, and the underscore character. The names of Control IDs cannot share the same name as the Secure Scripting Framework (SSF) Objects. For example, you cannot name a Control ID Loan or Form because those are also names of Scripting Objects. As a best practice, do not rename the Control ID using 'loan', 'auth', HTTP, or any of the SSF objects (e.g., 'session'). Using these indicators in an element name can result in errors when you attempt to perform agetObject on the element. For a complete list of scripting objects, see ICE Mortgage Technology Scripting Objects Reference.
To toggle the disabled property of an element through the Scripting Framework, please see the following sample code:
this.disable = function(newVal) {
 let ctrlObj = this.domElement;
 if (_def(newVal)) changeDisabled(ctrlObj, newVal, 1);
 return newVal;
};
var changeDisabled = function(domNode, newVal, startLevel) {
 if (domNode.localName == 'div' || domNode.localName == 'span' ||
  domNode.localName == 'label' || domNode.localName == 'a') {
  if (newVal) {
   startLevel == 1 && domNode.classList.add('em-ssfdisabled');
  } else {
   startLevel == 1 && domNode.classList.remove('em-ssfdisabled');
  }
 } else {
  domNode.disabled = newVal;
 }
 if (domNode.children.length > 0) {
  for (var i = 0; i < domNode.children.length; i++) {
   console.log('startLevel ', startLevel);
   changeDisabled(domNode.children[i], newVal,
    ++startLevel);
  }
 }
}
Creating Dynamic Drop-Down Fields
Administrators can add an array of key/value pairs to custom forms that then enable loan team members using the form to replace the current list of options in a drop-down field with a new list of options. The options include custom fields and fields that are not currently mapped to a specific field or location
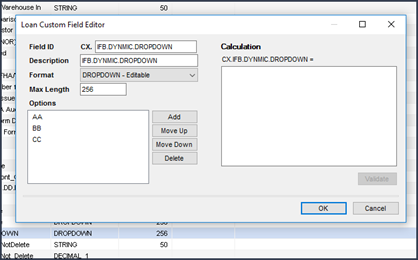
In order to utilize this new functionality, you must create one or more custom fields in Encompass. Visit the Loan Custom Fields setting in Encompass > Settings > Loan Setup > Loan Custom Fields to create custom drop-down fields, like the example shown here.

Once the field (or fields) are created you can then write a script (i.e., JavaScript) that will enable for users to select an element that will populate to new options to the custom drop-down list. Using the example field above, here is a sample of JavaScript code written for the field:
async function onChange_LoanType1() {
 let loanObj = await elli.script.getObject('loan');
 let val_1172 = await loanObj.getField("1172");
 let val_dd = await loanObj.getField("CX.IFB.DYNMIC.DROPDOWN");
 let ctrl = await elli.script.getObject("Dropdown2");
 populateDropdown(val_1172, ctrl);
}
async function populateDropdown(selectedOption, ctrl) {
 if (selectedOption) {
  //	let dropDown = await elli.script.getObject("Dropdown2");
  {
   value: selectedOption + '1_val',
   key: selectedOption + '1'
  }, {
   value: selectedOption + '2_val',
   key: selectedOption + '2'
  }, {
   value: selectedOption + '3_val',
   key: selectedOption + '3'
  }, {
   value: selectedOption + '4_val',
   key: selectedOption + '4'
  }


  // dropDown.options(myOptions);


 }
}
async function onFormLoad() {
 let loanObj = await elli.script.getObject('loan');
 let val_1172 = await loanObj.getField("1172");
 let val_dd = await loanObj.getField("CX.IFB.DYNMIC.DROPDOWN");
 let ctrl = await elli.script.getObject("Dropdown2");


 await populateDropdown(val_1172, ctrl);
 ctrl.value(val_dd);


}


async function Button1_click(ctrl) {
 let loanObj = await elli.script.getObject('loan');
 let val_1172 = await loanObj.getField("1172");
 let val_dd = await loanObj.getField("CX.IFB.DYNAMIC.NOOPTION");
 let dropDown = await elli.script.getObject("Dropdown4");


 await populateDropdown(val_1172, dropDown);
 dropDown.value(val_dd);
}


async function Button2_click(ctrl) {
 let loanObj = await elli.script.getObject('loan');
 let val_1172 = await loanObj.getField("1172");
 let val_dd = await loanObj.getField("CX.IFB.DYNAMIC.NOOPTION");
 let dropDown = await elli.script.getObject("Dropdown5");


 await populateDropdown(val_1172, dropDown);
 //	dropDown.value(val_dd);
}
Once the custom field is added to a form, users can select an option from the drop-down to populate the field, and then use the button (in this example) to repopulate the drop-down with new options and select a new option to populate to the field.
Managing JavaScript Files
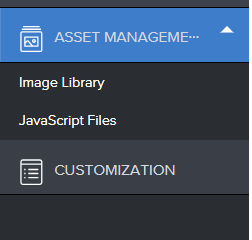
The Asset Management is where you can access a central repository of uploaded JavaScript files, which can be linked to Custom Forms in the Encompass Web Input Form Builder. These repositories are shared, meaning any change made to a file is universal and will impact the file across all products in which it appears.

To Access JavaScript Files:
• Log in to the Encompass Admin Portal and select Asset Management., and then select JavaScript Files.
NOTE: Currently, files uploaded to the Asset Management cannot be deleted.This will be addressed in a future release
JavaScript File Sharing Best Practices
The following are the recommended best practices for sharing JavaScript files across multiple forms, and for editing existing JavaScript files linked to a form.
Recommendations for Linking JavaScript Files to Multiple Forms
- JavaScript files should contain generic code across forms.
- When editing JavaScript files, keep in mind that these files exist in a shared asset repository. Any edits made to these files will impact the file in all products in which it appears. Please apply caution. Changes made to file names could result in errors in Custom Forms.
- To avoid unintended consequences to other Custom Forms when editing JavaScript files, create a unique JavaScript file for each Custom Form.
Recommended Process for Editing Existing Linked JavaScript Files
It is recommended that these steps are followed when making changes, especially on a large scale, to an existing JavaScript file:
- Before editing the JavaScript file, disable the Custom Form.
- Make your edits.
- Test the code.
- Enable the form.
Adding JavaScript Files
Administrators can upload external JavaScript files to the JavaScript repository in the Asset Management. JavaScript files stored in the central repository can be linked to Custom Forms.
To Upload a JavaScript File:
- From the Asset Management page, select JavaScript Files.
- Select Upload.
- Select Browse to browse to and select the external JavaScript file, or drag and
drop the file to the file drop area. - The file is uploaded to the JavaScript files central repository.
To Link a JavaScript File to a Custom Form:
- From the Customization page, select Custom Forms, and then select New.
- Click anywhere within the form workspace to display the form properties, but
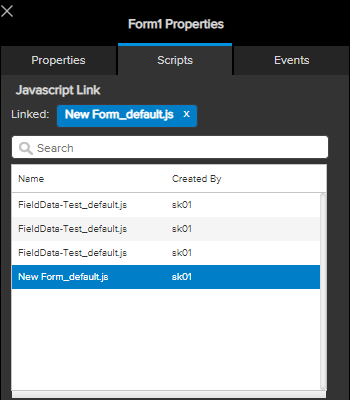
do not click to select an element. - On the Properties panel, select the Scripts tab.
- Select a JavaScript file to link to the form, or press the CTRL key to select
multiple JavaScript files.
NOTE: The JavaScript files listed for selection are all the files in the Asset Management’s JavaScript repository.
Using the Code Editor
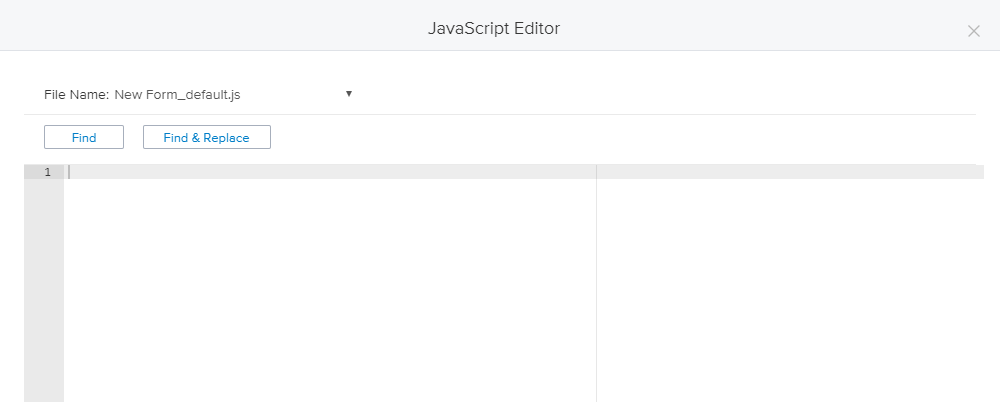
Administrators can use the Code Editor to create JavaScript code and save it as a JavaScript file from directly within the Encompass Web Input Form Builder.
These newly created JavaScript files are automatically linked to the current form.
To Open the Code Editor
- Log in to the Encompass Admin Portal and select Customization page, and then select Custom Forms.
- Select an existing form, or select New to start a new form.
- On the Form Workspace tool bar, select the Code Editor icon
</>to open the JavaScript Code Editor.

There are six components to the Code Editor:
• File Name: Select a JavaScript file from the dropdown to link to the form.When the JavaScript Code Editor is first accessed, it opens a blank JavaScript file that is automatically linked to the form. A default file name is assigned to the JavaScript file, which means it cannot be modified. If the file name already exists, you will be prompted to rename the file before saving. The file name adheres to the following format: _form name__default.js. For example, if the name of your form is Borrower Summary, the JavaScript file will be named Borrower Summary_default.js.
• Find & Replace: Select to expand the Find & Replace section, then search for
code text, or search and replace code text.

• Content Editor: Create or insert code in this section.
• Cancel: Select to cancel any edits and exit the Code Editor without saving.
• Save: Select to save the JavaScript file and any edits made to it. The JavaScript file is saved to the central JavaScript repository, which is accessed through Asset Management.
Libraries in the Asset Management are shared asset repositories. Any edits made to files in the Asset Management section will impact the file in all products in which it appears. Changes made to file names could result in errors in input forms.
The JavaScript file is automatically linked to the current form. Linked JavaScript files can be viewed through the form properties.
When saving a JavaScript file directly in the Code Editor, a default file name is given. If that file name already exists, you will be prompted to rename the file before saving.
To View JavaScript Files in Form Properties:
- Click anywhere within the form workspace to display the form properties, but do not click to select an element.
- On the Properties panel, select the Scripts tab.
- Linked displays the JavaScript files that are linked to the current form.

Updated about 1 year ago
