Custom Tools
What are Custom Tools?
The Custom Tools feature enables you to embed secure (https) custom HTML pages within the Encompass product. These HTML pages, which are hosted externally, are displayed in an iFrame so that the user doesn't need to leave the loan application to access them.
The Custom Tool feature can be used with any external website. To use this feature to interact with data from a loan file you must develop and host your own HTML page that utilizes the ICE Secure Scripting Framework and the page must be hosted on a secure (https) location.
Using the Custom Tools feature, you can also create Global Custom Tools. The Global Custom Tools option enables you to provide loan officers with access to a custom web page, custom tool, custom form, standard tool, standard form, another global custom tool, or application that you (or a third-party provider) maintain and operate. Or you can set it up to use any external website. When you apply the Global Custom Tool option to a custom tool, the web page/application
will be available to view at any time in Encompass regardless of if they are in a loan file or viewing the Pipeline or elsewhere. Instead of only being able to access custom tools when viewing a loan file, loan team members can pick
the custom tool they want to view from the Apps menu at the top of the Encompass screen.
Note that a Global Custom Tool can be created, and then loan team members can click the "app" in the menu in to access a custom tool, standard tool, standard form, custom form, another global custom tool, a custom website, or an
item provided from a plugin.
Any application that is loaded as a Custom Tool or Global Custom Tool can potentially access data on a loan. You should only use custom tools for trusted pages and applications.
Getting Started with Custom Tools
Requirements
Ensure that X-Frame-Options is removed from the header of your guest application. Having any kind of X-Frame-Options may prevent the guest application from being rendered inside the host. Visit the Mozilla X-Frame-Options documentation page for more details.
In order for a guest application to interact with the host, it must load and initialize the Scripting Framework Guest Library: a JavaScript library containing the functions that allow for retrieval of the scripting objects published by the host application. The means by which an integration loads and initializes the library depends on the integration context in which the custom code executes.
However, in cases where the lender or partner is creating a custom page/application hosted on a remote web server, it is the responsibility of the lender or partner to load the Scripting Framework Guest Library into their page before attempting to use it. Loading the Scripting Framework guest library can be done in one of two ways, depending on your development approach and
application architecture:
Approach #1: Include as Script Tag
The most straightforward approach to including the Scripting Framework Guest Library into your web page/application is to include a <script> tag in your page(s) that references the Scripting Framework Guest Library from ICE Mortgage Technology's web servers, for example:
<script src="https://cdn.elliemae.io/elliemae/core/ssf/1.0/elli.ssf.gue st-with-polyfill.js"></script>
This script defines a single, global object, elli.script, which provides all of the entry point functions in the guest library. The script tag should be included in your page prior to any other scripts that attempt to invoke the elli.script object (preferably in the <head> portion of the page).
ICE Mortgage Technology provides two versions of the Scripting Framework Guest Library for you to choose from when adding your script tag:
-
The elli.ssf.guest-with-polyfill.js file includes a polyfill library that allows the use of modern JavaScript features (e.g. Promises) that are not available in legacy web browsers. This should be your default choice unless you are already including a polyfill library (e.g., the Babel Polyfill library) in your page as a separate script tag.
-
The elli.ssf.guest.js file includes only the Scripting Framework Guest components and excludes the polyfill library. Use this version of the script only if you are already including a polyfill library in your page. Note that the script tag for your polyfill library must precede the script tag for the Scripting Framework Guest Library.
Approach #2: Include as an NPM Package
If you are building your web application using a JavaScript dependency management/bundling tool such as npm or yarn, you can include the Scripting Framework Guest Library package in your project as a dependency. The package is published as a public NPM package under the name @elliemae/em-ssf-guest.
The following example shows how you would install this to your project using npm:
$ npm install @elliemae/em-ssf-guest
The em-ssf-guest package does not include a polyfill as a dependency in order to prevent lock-in with a specific polyfill implementation. If you do not already have a polyfill included in your package.json file's dependencies section, then you will need to add a dependency on the Babel Polyfill library and include the library in your bundle file.
Integration Details
This section is the integration type details for Custom Tools.
Security Context
Custom code runs with the privileges and access of the user logged into the host application.
Origin Policy
- Origin Policy: Standard
- Description:
- Applies standard "same-origin" security controls to the integration
- Used in cases where the integration is served from a domain other than the Application's domain
- Restrictions:
- Cannot directly access host window DOM or JavaScript objects
- Cannot modify or override the CSS or styling of the host application
- Cannot invoke any web-based API that does not allow calls from the guest's origin (i.e.domain) via CORS restrictions
- Cannot access or use the Session ID or Access Token from the host application (use the Auth Object to generate an API Access Token for use by your custom code)
Implementation Method
- Full web page/application
- Hosted, maintained and operated by the lender/partner
- Launched on-demand by the user
- Presented as a "Tool" within the Encompass Loan Editor UI
Applicable Use Case
- Provide a completely custom UI that can interact with the Loan and participate in the Loan editing flow
- Provide integration to external systems with their own UI using SSO
Process Overview
The overall process for implementing a Custom Tool in Encompass involves the following high-level tasks.
-
Develop and deploy the Custom Tool - The client developer creates the Custom Tool and publishes the tool’s HTML page. The client developer provides the URL of the Custom Tool to the Encompass administrator.
-
Integrate the Custom Tool - Integration includes the following tasks:
- Configuring scripting objects - Enable guest access to scripting objects, set up event subscriptions and configure how your application will respond to events. To learn more, see ICE Mortgage Technology Scripting Objects Reference.
- Authenticating to Developer Connect and other external websites - Obtain an access token for Developer Connect APIs and set up SSO. To learn more, see Authenticating to Developer Connect and Other External Websites.
-
Add the Custom Tool to Encompass via the Encompass Admin Portal- The Encompass administrator adds the Custom Tool to Encompass. The administrator must have the URL of the Custom Tool in order to add it successfully.
Sample Custom Tool
You can view a sample Custom Tool in the following link:
https://github.com/intercontinentalexchange/imt-loconnect-custom-tool-sample
Managing Custom Tools
The Encompass Admin Portal allows you to add a new Custom Tool, edit an existing Custom Tool, delete a Custom Tool, activate/deactive a Custom Tool, or export a list of all Custom Tools to a CSV file.
• To manage your Custom Tools, log in to the Encompass Admin Portal and select Customization, and then select Custom Tools. This is the Custom Tools page.
To Add a Custom Tool:
- Log into Encompass as an administrator.
- Click Customization, and then click Custom Tools.
- Select New Custom Tool.

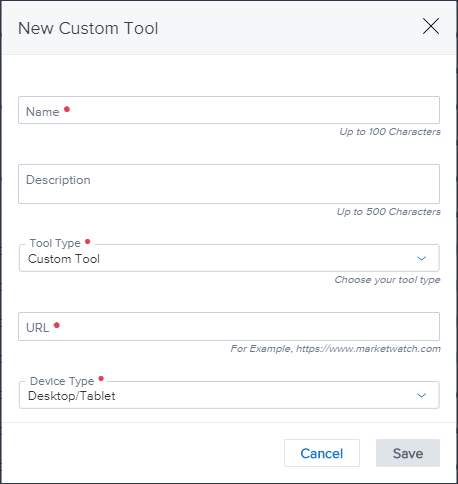
- On the New Custom Tool window, enter the name of the tool in the Name field.
- Enter a description of the tool in the Description field.
- Select Custom Tool from the Tool Type drop-down list.
- To create a Global Custom Tool, refer to the To Add a Global Custom Tool steps below.
- Enter the web address where the custom tool is hosted in the URL field. Note
that this web address must be a secure (https) address. - Select the device type the tool will be available for in the Device Type field.
- Select Save.
To Add a Global Custom Tool:
- Log into Encompass as an administrator.
- Click Customization, and then click Custom Tools.
- Select New Custom Tool.
- On the New Custom Tool window, enter the name of the tool in the Name field.
- Enter a description of the tool in the Description field.
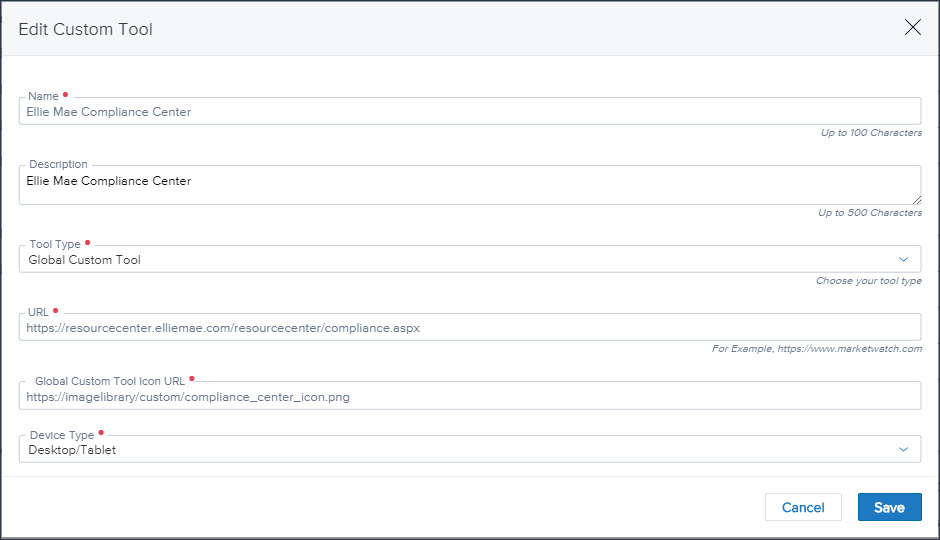
- From the Tool Type drop-down list, select Global Custom Tool.

- Type the URL for the image icon you want to use for this custom tool. (This will
be the icon the loan team member will click to access this custom tool in
Encompass.)
- The image file you select for an icon should be no larger than 28px by 28px. Image files larger than this can be still be used, but they may not render well when displayed in Encompass.
- For Global Custom Tools, the Device Type is automatically set to Desktop/Tablet and cannot be changed.
- When finished, click Save. The custom tool is now indicated as a Global Tool.

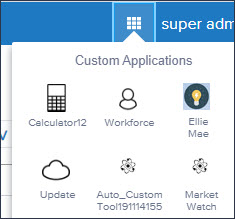
- To view or preview Global Tools, click the Apps menu located in the top-right of the Encompass screen.

- Click an icon to view the global custom tool. Note that icons for both active and inactive custom tools are displayed here for administrators.
- Once clicked, the global custom tool displays in its own tab on the Encompass screen. This tab remains on the screen so you can navigate to other areas, and then click this tab at any time to view the tool again.
- To close the global custom tool, click the Apps menu, and then click the icon for the tool that is currently displayed. Note that only one global custom tool can be displayed on the Encompass screen at one time.
To Edit a Custom Tool:
- From the Custom Tools page, select the Custom Tool you wish to edit.
- Select the Edit (pencil) icon.
- Edit the Name, Description, URL, or Device Type of the Custom Tool.
- Select Save.
To Delete a Custom Tool:
- From the Custom Tools page, select the Custom Tool you wish to delete.
- Select the Delete (trash) icon.
To Activate/Deactivate a Custom Tool:
- From the Custom Tools page, select the Custom Tool you wish to activate, or deactivate.
- Select the Activate / Deactivate button.
To Export a List of All Custom Tools to CSV:
- From the Custom Tools page, select Export to CSV.
- When asked to save the CSV file, select Yes.
The CSV file is downloaded to your local harddrive
Updated 5 months ago
